Let’s look at some common scenarios that Word users hit when using LaTeX. If you missed the intro to LaTeX for Word users in Part 1, see here.
Contents
- Formatting words
- Formatting paragraphs
- Headings
- Lists
- Symbols and Accents (diacritics)
- Page control
- Hyperlinks
- Headers and footers
- Tables
- Graphics
- Summary
Formatting words
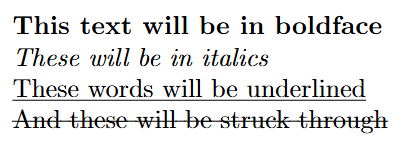
\textbf{This text will be in boldface}
\textit{This will be in italics}
\underline{These words will be underlined}
The ulem package provides even more options e.g., double-underline (\uuline)
and strikethrough (\sout), e.g. \sout{strike me out}.

Formatting paragraphs
LaTeX fully-justifies paragraphs by default, and handles all the breaks and
hyphenation for you. It takes great pains to flow paragraphs in a coherent and
visually-pleasing way, so, be cautious about attempting to manually override
its choices. That said, you might choose to set some of the following options:
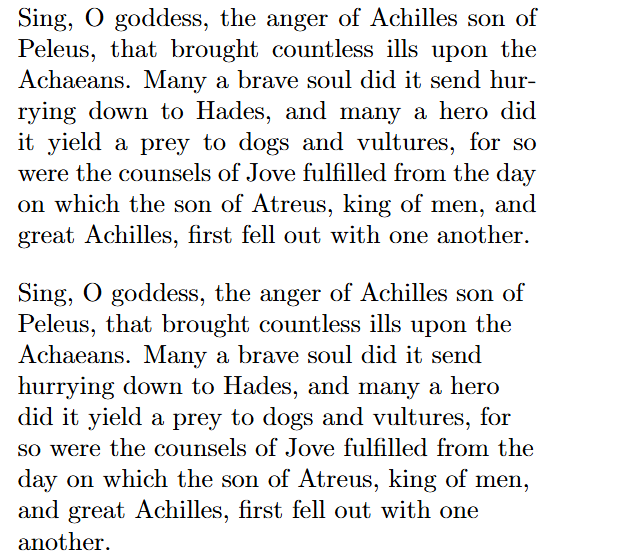
flushleft, flushright, centered. For example:
% Default: what Word would call 'justified'
%
Sing, O goddess, the anger of Achilles son of Peleus, that brought countless
ills upon the Achaeans. Many a brave soul did it send hurrying down to Hades,
and many a hero did it yield a prey to dogs and vultures, for so were
the counsels of Jove fulfilled from the day on which the son of Atreus,
king of men, and great Achilles, first fell out with one another.

% Left-aligned
%
\begin{flushleft}
  Sing, O goddess, the anger of Achilles son of Peleus, that brought countless
  ills upon the Achaeans. Many a brave soul did it send hurrying down to Hades,
  and many a hero did it yield a prey to dogs and vultures, for so were
  the counsels of Jove fulfilled from the day on which the son of Atreus,
  king of men, and great Achilles, first fell out with one another.
\end{flushleft}

The ragged2e package provides additional control, notably if you need to
write a two-column document and you want fine control
over how the hyphenation and line breaking works on the short lines that
columns tend to have.
Headings
Word has the notion of Headings in the Style Gallery: Heading1, Heading 2, Title, and so on. These styles determine formatting and also influence actions such as creation of a table of contents. Broadly speaking, LaTeX has the notion of “sections” and “sub-sections” instead of multi-level headings. LaTeX automatically handles numbering, indentation and suchlike, and creation of the table of contents is very easy.
\section{Executive overview}
  The section command marks a new section. Put the title in curly braces.
  Then, write the content.
  ...
\section{Background}
  You can start a new section at any time, and LaTeX will number them automatically.
  ...
  \subsection{Event timeline}
  You can include subsections, and subsubsections, to drill down further.
  ...
\section*{Risk assessment}
  A special feature is that by tagging a section with an asterisk, the section
  will not be included in any table of contents.
For the table of contents, simply invoke the \tableofcontents command.
Typically this is at the top of the document, of course.
\tableofcontents
Lists
LaTeX supports multi-level, bulleted and numbered lists, out of the box.
You can mix and match list types as you please. There is also a very powerful
enumitem package with extended capabilities, e.g. if you decide that you
want your bullets to be emojis. For typical documents, it is overkill.
(Again, in keeping with the LaTeX philosophy: while you can do these things,
pause and question if you should. The aim is to focus on productive writing,
not burning time tweaking every last pixel. Yak shaving, anyone?)
Bulleted lists
A bulleted list in Word maps to an itemized list in LaTeX:
\begin{itemize}
  \item Operations
  \item Security
  \item Investor Relations
\end{itemize}
Numbered lists
A numbered list in Word maps to an enumerated list in LaTeX. You don’t need to worry about the numbering: LaTeX works it out for you.
\begin{enumerate}
  \item Collect input from teams
  \item Draft RFI document
\end{enumerate}
Nested lists
You can nest lists simply by putting a new \begin{itemize} or enumerate
bloc in the middle of a list, like so:
\begin{enumerate}
  \item Collect input from teams
  \begin{itemize}
        \item Operations
        \item Security
        \item Investor Relations
  \end{itemize}
  \item Draft RFI document
\end{itemize}
Lists can be nested up to four levels deep. Beyond that, you can use the
enumitem package, or consider your life choices.
The lists look great…but they are too spaced out
If there is too much space between entries in a list, you can tighten things
up by adding [noitemsep] to the begin command, e.g.
\begin{itemize}[noitemsep]
This is similar to how Word treats [Enter] and [Shift][Enter] differently
in terms of how much whitespace to insert after a line.
Inserting symbols and diacritics
Most symbols on the (US) keyboard are typed as-is. Notable exceptions,
that need to be escaped
(see Part 1)
are, more or less, the symbols you see on the number row of the (US) keyboard
(~, !, @, #, …, _), \,
and {}. If in doubt, try it out.
Accents/diacritics
Characters with diacritics used in Western (Latin script) languages,
such as in the French word “théorèmes”, can be typed directly into LaTeX,
assuming your keyboard supports it. However, you should add the fontenc
package with the T1 option to your document, so that LaTeX encodes such
characters effectively (important if you are going to share PDFs
generated with LaTeX).
\usepackage[T1]{fontenc}
Currency
The fontenc/T1 combination also provides better results when you type
common currency symbols directly. To be very explicit, or if you don’t have
the symbols on your keyboard (e.g., you are in the US, and want to use the
UK Pound symbol), import the textcomp package.
\usepackage{textcomp}
...
In the US, an orange cost 49{\textcent} in 1950, and {\textdollar}1 today.
In the UK, it costs {\textsterling}2.50, and in Japan, {\textyen}300.

Other symbols
If you know what your symbol should look like, but you don’t know what package it is in, use Detexify search lets you ‘draw’ an approximation, and finds the best match for you.
If your needs extend beyond common Western requirements, e.g., you need to type Vietnamese, or include the Indian Rupee symbol, search for a suitable package on the CTAN archive.
I used quotation marks, but they look weird
For example:

Word converts opening and closing quotation marks into a more visually-pleasing
pair of “smart quotes”. To get this effect in LaTeX, use one or two backquotes
` to open and the matching single ' or " to close.
``Happiness," she said, ``is a full order book."

Page control
LaTeX, like Word, will handle page breaks for you. The article document
class, which is a great starting point for users coming from Word (see
Part 1), automatically includes a page
number centered at the foot of every page. Also see
notes on headers/footers below.
Overriding page breaks
In normal operations, just as in Word, you should not need to manually insert page breaks, because LaTeX will handle it for you. This includes avoiding “widows and orphans” (paragraphs that only run for a line or two before spilling on to the next page).
That said, if you want to force a page break, \newpage will do it for you and
is the closest to Word’s Insert Page Break command.
 This text would appear on one page
\newpage
 and this text would appear on the next.
Conversely, if you want to keep a block of text from being split across two pages,
then \samepage, and sometimes \nopagebreak, are what you need:
\begin{samepage}
 This is the first paragraph. Notice how it is enclosed in a samepage block.
 This means that LaTeX will keep this entire paragraph on one page.

\nopagebreak
 However, sometimes you want to ensure that multiple paragraphs remain together
 on the same page. In this case, use \nopagebreak along with samepage.
\end{samepage}
Margins and paper size
Use the geometry package. After importing it
(\usepackage{geometry}) and before starting the document (\begin{document})
simply set the options that you want, e.g.:
% Paper size, orientation, left, right, top margins
\geometry{letterpaper, portrait, lmargin=1in, rmargin=1in, top=1in}
Hyperlinks and references
Use the hyperref package to add support for embedding hyperlinks in your
document, and then call \href, like so:
\usepackage{hyperref}
...
I used to use \href{https://en.wikipedia.org}{Wikipedia}. I still do, but I used to, too.
You can reach us at \href{mailto: info@example.com}{info@example.com}.
References are also useful for internal links within your document, what Word would call a ‘Cross-reference’. Suppose you label a table (see Tables) with:
\label{table:shopping}
You can refer to it elsewhere in the document with
For more information see Table \ref{table:shopping}.
The reader will see (an automatically-generated) number, and be able to click on it to go to the reference. (They will not see the label ‘shopping’.)
Headers and footers
LaTeX is wildly high-powered here, so the problem for Word users is not so much can it be done, but how to make sense of the hundreds of pages of documentation describing all the options. I’ll focus solely on common Word-like tasks.
The main thing is to use the fancyhdr (“fancy header”) package, which handles
headers and footers. Other packages can build on this to give you what you need.
A typical combination:
\usepackage{fancyhdr}    % header/footer control
\usepackage{lastpage}    % lets us do 'page X of Y'
\usepackage{hyperref}    % adds link support, e.g. clickable page numbers

\begin{document}
  \pagestyle{fancy}     % Override default header/footer from the doc class
  \fancyhead{}          % Reset header to empty
  \fancyfoot{}          % Reset footer to empty

  ... ... ... ...       % set header and footer options here

  ... ... ... ...       % rest of document
\end{document}
Page X of Y
For example, with the preamble above, set the following in the header/footer
options to have the page number and total number of pages displayed in the
footer, on the right [R]:
\fancyfoot[R]{
    Page \thepage\ of \pageref{LastPage}
}
Today’s date
The \today command is what you need. Strictly, this is the date that the
LaTeX file was compiled (which is the step before exporting to PDF, for most
people). For example:
% Date in top center header
\fancyhead[C]{
  \today
}
Tables
Another case where LaTeX can be overwhelming. We’ll show an example that is more than trivial, but still rich enough to cover most use cases from Word.
Start by importing key packages:
\usepackage{booktabs}	% Rich control over tables
\usepackage{siunitx}	% Adds support for aligning columns on decimal points
						% e.g. for columns of currency amounts
\usepackage{multirow}	% Support for merging columns and rows into single cells
Then, in the document, start a table definition with \begin{table}, set
options such as the number of columns, and how they should align, and start
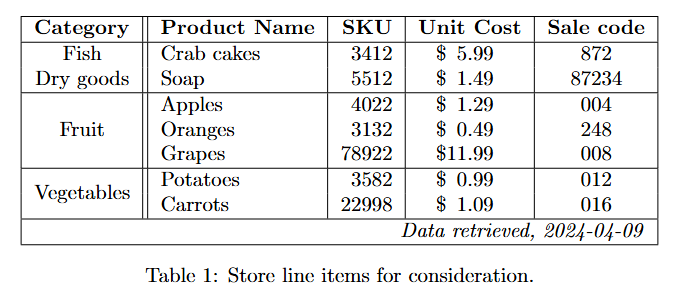
entering your data. Here’s the worked example:
% Start the table definition. Place the table inline with the rest of
% the document text (h!).
%
\begin{table}[h!]

  % Centered on the page
  \centering

  % Define the column layout. We want five columns, separated either by a
  % single- or double-line border (think of Word's Borders and Shading tool).
  % The columns can be left- or right-aligned, or centered - l, r, and c here.
  % S aligns on decimal points.
  %
  % Pro tip: Consider whether vertical lines separating columns are genuinely
  % required, or only add visual noise. Your table may be more legible without
  % them - in which case, delete the | characters.
  \begin{tabular}{ | c || l | r | S | c |  }

    % Whenever we want to draw a horizontal 'border' line, use \hline.
    % The booktabs package also offers \toprule, \midrule, and \bottomrule,
    % which some people prefer on aesthetic grounds, but \hline is closest
    % to the style produced by Word.
    %
    \hline

    % Column headers, here, in boldface. Notice the ampersand (&) between columns
	% and the ending linebreak (\\).
    \textbf{Category}     &
    \textbf{Product Name} &
    \textbf{SKU}          &
    \textbf{Unit Cost}    &
    \textbf{Sale code}     \\
    \hline

    % You can now type in entries in the table, separating each column entry
    % with ampersand (&) and ending each row of the table with \\.
    Fish & Crab cakes & 3412 & \$5.99 & 872 \\
    Dry goods & Soap & 5512 & \$1.49 & 87234 \\
    \hline

    % Word's Merge Cell function is covered by multirow and multicolumn in LaTeX.
    % Span the next three rows with the first column containing the word "Fruit".
    % The asterisk asks LaTeX to calculate the width automatically.
    \multirow{3}{*}{Fruit} &
        Apples   & 4022  & \$ 1.29  &   004\\
      & Oranges  & 3132  & \$ 0.49  &   248\\
      & Grapes   & 78922 & \$ 11.99 &   008\\
    \hline

    % Span two rows.
    \multirow{2}{*}{Vegetables} &
        Potatoes  & 3582 & \$0.99  & 012 \\
      & Carrots   & 22998 & \$ 1.09     & 016 \\
    \hline

    % Span all five columns, right-aligned
    \multicolumn{5}{|r|}{\textit{Data retrieved, 2024-04-09}} \\
    \hline

  \end{tabular}

  % Captions can be inserted before or after tables depending on where
  % you want them to appear.
  %
  \caption{Store line items for consideration.}

  % The label command makes it easier to cross reference the table from elsewhere
  % in your document, using the \ref command, e.g. \ref{table:shopping} would
  % link the reader to the table that you had labeled 'shopping' inside your
  % document. That is, the reader would not see the 'shopping' tag, but a number.
  %
  \label{table:shopping}

\end{table}
It produces this:

Graphics
To insert an image from a file, import the graphicsx package and set the path
to the folder containing the image(s) you will use. The path can be relative to
the current directory (where your LaTeX document is) or absolute.
\usepackage{graphicx}	% Add support for Graphics. Notice the 'x' in the name!

% Set the path, according to your system type and need, e.g.
\graphicspath{ { C:/path/to/images/} }	  % Windows, absolute path

% Alternatives: (use only one, and comment out or remove the others):
\graphicspath{ { ./images/         } }   % Windows/Mac/Linux, relative path
\graphicspath{ { /path/to/images   } }	  % Mac/Linux, absolute path
Within the body of the document, call the \includegraphics command with the
name of the file (the extension is not normally needed), e.g.:
% Display the graphic from the monalisa file.
\includegraphics{monalisa}
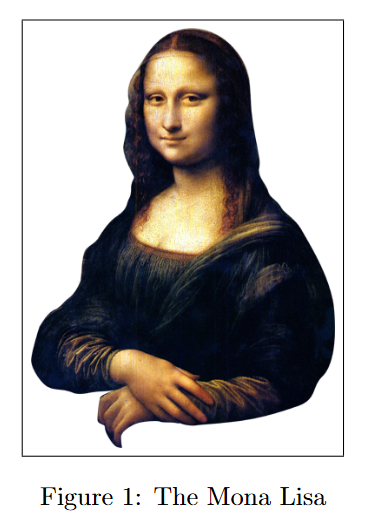
For more ‘formal’ image embedding, e.g. you want to be able to cite the picture,
such as, “see Figure 1”, create a figure block, as in this example:
% Define a new figure (graphic). Place it inline with the rest of
% the document text.
\begin{figure}[h!]

  % Center the image on the page
  \centering

  % Import the file "monalisa" (.png, .jpg, etc.)
  % Scale the image to be 0.5 times the width of a line. You can of course
  % vary this to suit.
  %
  % Pro tip: to remove the border around the image, remove the call to \fbox
  % that surrounds \includegraphics{ ... }.
  %
  \fbox{ \includegraphics[width=0.5\linewidth]{monalisa} }

  % Caption and label the image.
  \caption{The Mona Lisa}
  \label{fig:art01}
 \end{figure}

Summary
These notes are not intended to represent the “best” or “only” way to use LaTeX if you come from Word. But I hope that I have been able to explain how LaTeX thinks about documents, how it differs from Word, and how some of the most common operations in Word might look in LaTeX. Got any comments? Let me know.